Someone over there on Instagram must really hate developers. That, or they don’t like much the idea of you showing their content on your site and they try to make it harder and harder with every API update. To be fair, it’s been two years since Instagram (aka Facebook) announced that they are going to shut down their old APIs. So, the time has come and after a small delay (mostly because of COVID-19), on June 29 the Instagram Legacy API will no longer be available. What this probably means is that if you used the API to fetch Instagram photos on your website, that part of your app will stop working.
“OK then”, you might rightfully say, “let’s just use the new API”. Well, apparently it’s not so easy, as it needs some special handling compared to the old one. Plus, a complete, concise tutorial is nowhere to be found yet (or at least I couldn’t find one). The clock is ticking, though, so I had to dig into the documentation to figure this out, and here is what I learned.
Part 1: Generate the Token
- The first thing you need is a so-called long-lived token that will permit you to access the user’s media. To generate that Token, you have to create a new Facebook App on developers.facebook.com.
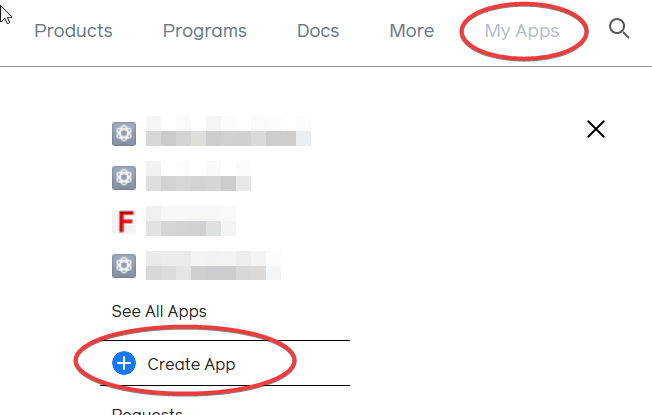 There, you follow the straightforward on-screen instructions to create a new App ID.
 - Next, you need to set up Instagram. On your Apps list, go to the newly created app and click on “Add a Product“.
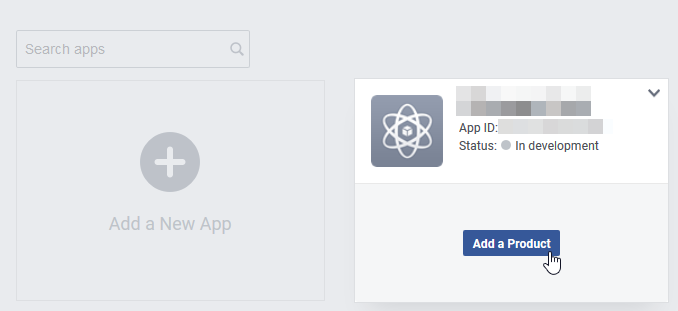
- On the products list that will open, scroll until you find Instagram, and click “Set Up“.
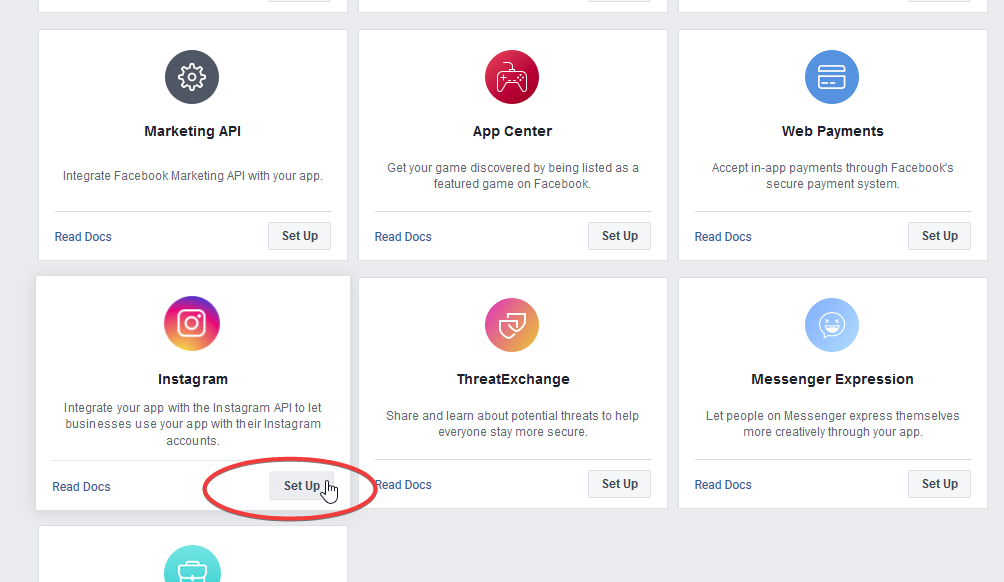
- Then, on the next screen, click on “Basic Display” and “Create New App“.
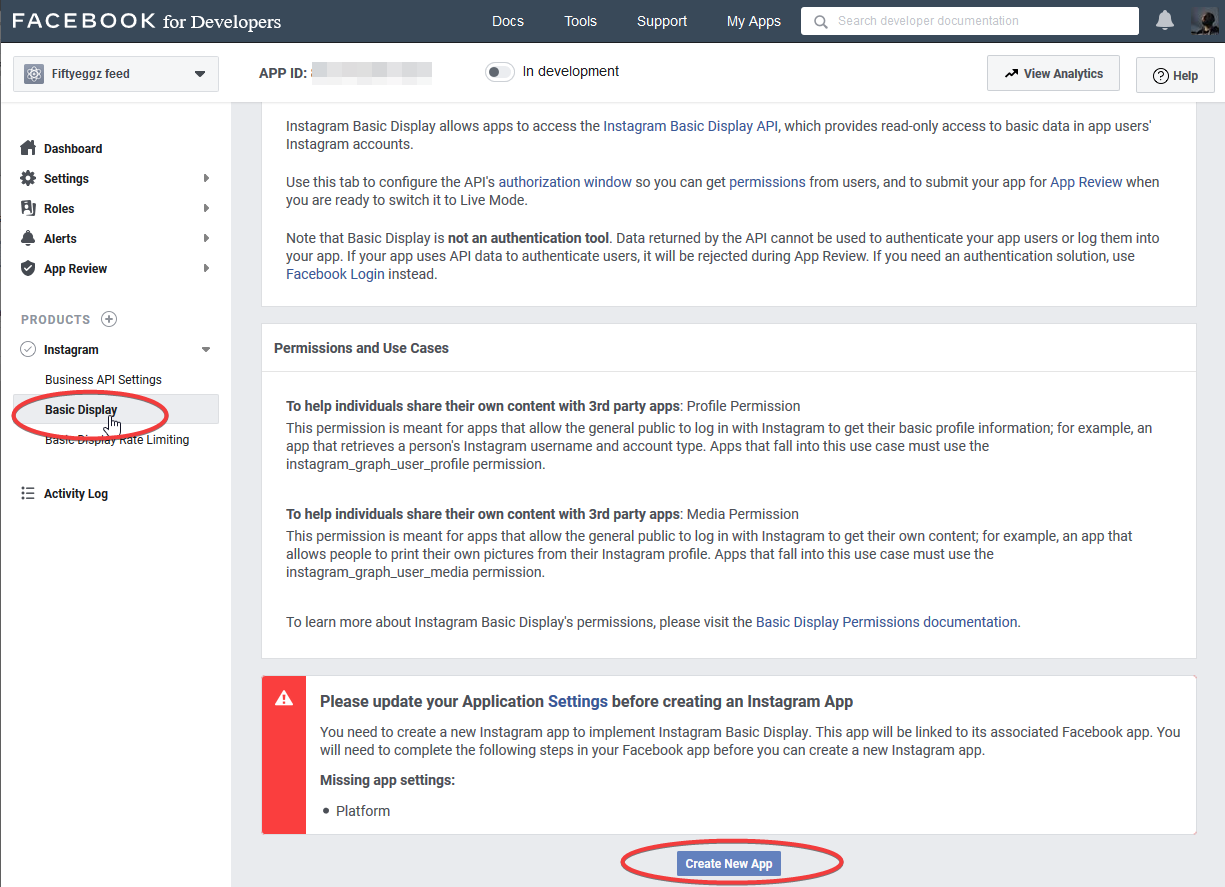
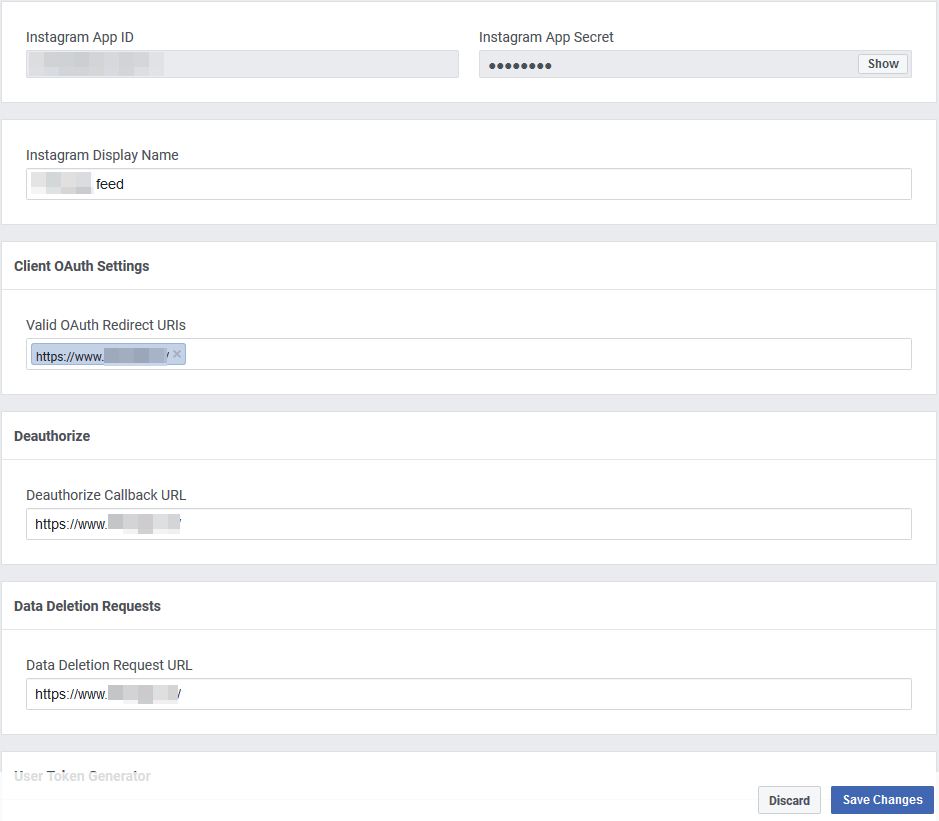
- Add valid URLs (basically, this can simply be the link of your site) and Save your changes.
- Then, you need to create a new token. To do so, you first need to add as an Instagram Tester the user whose photos you need to fetch, by clicking first on “Add or Remove Instagram Testers” and then “Add Instagram Testers“:
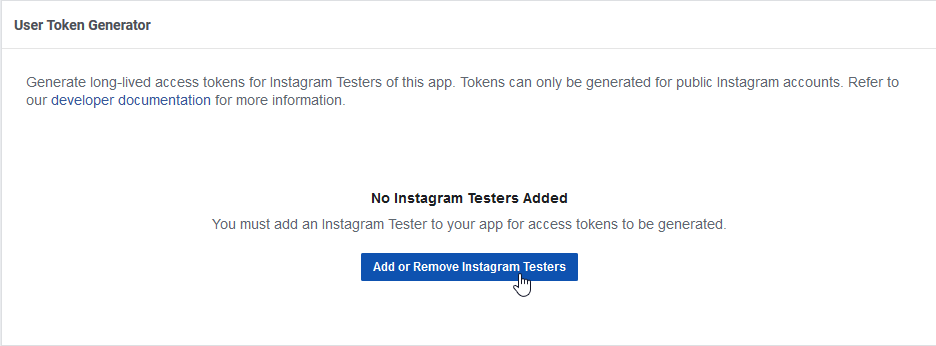
 This will send an invitation to the Instagram user, which they must accept in the Apps and Websites section of their profile. As soon as they do that, you are ready to go and create your token.
- To generate your token, you have to go back to the Basic Display, scroll down to the “User Token Generator” and click on the “Generate Token” button. Keep in mind that tokens can only be generated for public Instagram accounts.
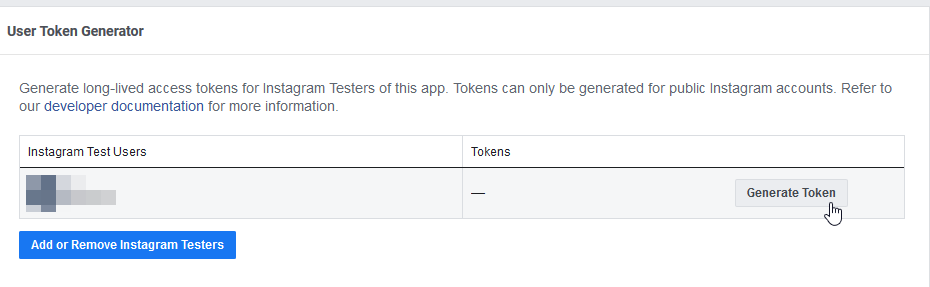
For the token to be generated, the Instagram user needs to give their permission. After doing so, the token will be ready to copy and use it on your App.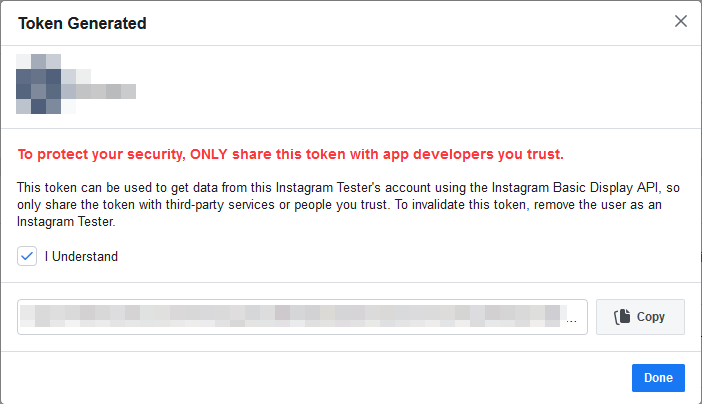
Part 2: Coding your app
TL;DR: If you don’t mind about the details, just go get the code that fetches the Instagram entries and stores them into an array. If you do, the explanation follows.
Getting the Token was the easy part. If you are creating an app solely to generate access tokens with the User Token Generator, you do not need to submit your app for App Review. The User Token Generator does not require any permissions and can be used while your app is in Development Mode. So, if all you want is to fetch the recent photos of a public Instagram account on your site, you are ready to go to the implementation part.
Fetching data from the Instagram Basic Display API
Here’s where it gets tricky, though: Contrary to the old implementation, the new API requires you to make multiple calls to fetch your photos. More specifically, first, you have to make a call to the User endpoint of the Instagram Basic Display API. This call requires two parameters: The token that we generated earlier, and the User ID, which should not be confused with the App ID that you might notice on the screens of the earlier steps. To find the correct ID, you can paste the token to the Access Token Debugger, which will show you, among other info, the User ID that you need.
The User endpoint will only return the latest media IDs of the given account. That means that you don’t have access to the photos’ URLs or the links to the actual Instagram posts. To get them, you need to loop over the media IDs, and for each one of them, make another call to the Media endpoint.
“Ok, it’s not such a big deal”, you might say. Well, actually there are two more things that we need to take care of before deploying our code.
Dealing with the Instagram rate limiting
The first one is that Instagram has some limits to the number of calls your app can make per hour. On a relatively high-traffic site, this might be a problem. That’s why I figured that a nice way to deal with it is to store the call in a WordPress transient, which will expire every hour. That way, you will only have to call the API once every hour and store its results to the database.
Refreshing the Token
Long-lived access tokens like the one that you created on the earlier steps are only valid for 60 days, after which they expire and you will have to generate them again. Luckily, Instagram offers a way to refresh them by making another API call. Refreshing a long-lived token makes it valid for 60 days again and you can do it only for tokens that are at least 24 hours old. Long-lived tokens that have not been refreshed in 60 days will expire. So, why not make that call once every hour too, along with the rest of the code? It will ensure that the API is always fresh and if it’s newer than 24 hours, it will simply get ignored. I didn’t see any warning against that, so I guess that it conforms to Instagram’s rules.
Eventually, we end up with the following function, which will return an array of photos for us to present them whichever way we like. Besides the obvious $token and $user parameters, which are the only ones that are mandatory, you can also modify the number of entries to be fetched, the fields to be returned, as well as the acceptable media types. I’ve also included some inline comments to further explain the code.
That’s all! It wasn’t easy, but now that we ‘ve put it all in order, it doesn’t seem so intimidating anymore, either. Of course, if you know of a better way to fetch Instagram photos on WordPress, let me know in the comments!
(The cover photo of the article is by Lisa Fotios from Pexels)
Thanks for this, managed to use your script in my Laravel project. Need to tweak a few things, like transient to Cache::. Works like a charm!
I’m glad it worked out for you. Indeed, if you modify the WordPress-specific parts, it should be OK 🙂
Thanks for this! Any idea why could be the token generator crashing after instagram user login – displaying “Sorry, something went wrong” FB for Developers page… I’ve tried adding more Instagram Testers and the same thing happened… with no tokens generated. Thanks for any idea!
Hi. I’m not sure that I have a suggestion for that, as Facebook’s message seems too vague. I’d also try with a different browser with a clear history and maybe wait for a few hours, as this could be a temporary issue. Then, if it persisted, I would do a test with a different Facebook and Instagram account, just in case it is a bug somehow related to the specific account.
It seems it must have been just some hiccup on FB’s part… now it’s working flawlessly. Thanks again for a great post (not to mention it finally got me to dig deeper into WP Transients… awesome! 🙂
Hello, i tried adding your code but it doesn’t work. Is there anything special to do in addition?
( sorry for my english I’m French… 🙂 )
Hi,
What do you get if your var_dump the results of the function?
PS: a clarification, just in case: the code should not print out anything. It will give you an array of photos that you can take and use in your own markup.
if I do var_dump ($output) I get NULL
We agree we must add his token after $ token, like $ token = ‘TOKEN’?
Same for $ user?
aa ok do you have a track to echo the result ?
it’s really to find info on the subject so well done for your work !!!!
thank you 🙂
Here’s an example:
Great !! it’s perfect it works! thank you very much!
hi, i have another question, do you know how to add more media? It looks like the system is stuck at 10. Thank you!
You need to pass a third parameter to the function like so:
get_instagram_media( ‘TOKEN’, ‘USER_ID’, 20);
Hello,
Im desperatly trying to fix my Instagram feed I used the depricated API that stopped the 29 June.
So I found yours, but I get no result shown.
All I did is add this two lines to check if it works:
$result = get_instagram_media(‘my TOKEN’, ‘my USER_ID’);
var_dump($result);
And here is the result:
array(0) { }
Can you help please.
Thank you
Hi,
Did you follow the first part of the tutorial, to generate a new token? If you did, make sure that you also have the correct user id, as found here: https://developers.facebook.com/tools/debug/accesstoken/
Thank you very much !
I was indeed using the wrong ID.
Another question regarding the use of get_transient() (Im new to WordPress and his functions), you say we fetch once every hour, where do you set that time interval, does get_transient() set it as 1hour or can we change it ?
It’s the part that says
HOUR_IN_SECONDSinset_transient(). It is a WordPress constant which translates to 3600 seconds (which is one hour). For example, you could use it like so:2 * HOUR_IN_SECONDSif you wanted to make it change every two hours. For more information about transients, check the following link: https://developer.wordpress.org/apis/handbook/transients/
God damn, you’re the boss !
Have a nice day.
Thank you.
Hi, I tried adding 20 after the USER_ID, but it doesn’t work the parameter is not taken into account, do you have any idea why?
My guess is that it keeps loading the cached version, due to the transient. You can wait for an hour until it makes the new call, or manually clear the transients (if you don’t know how to do that, then just waiting for an hour should probably be better).
What if you don’t have wordpress? will this script still work.
Well, you would need to adapt it a bit to accomodate your platform’s needs, but according to the feedback that I see on the rest of the comments here, it should work fine.
Wonder if anyone would be so awesome to add a script similar to what you gave with the demo php example, but as a standalone non wordpress script. =P
Thanks so much for this. So helpful, and it works! Here’s a basic (and probably dumb) API question though:
I plan on setting up a few clients with this, so that we can show the latest IG posts on their sites. If there are limits to the number of calls, then it would seem I should make separate apps for each client. Is that true, or am I able to bundle multiple client ‘Testers’ into 1 app? The limits to the number of calls would be the concern here, correct. None of them are super high traffic sites. Wondering what the best practice would be.
Thanks!
I am not sure if you can even use an app for more than one site, given that you have to assign a valid URL on the app level. Of course, that URL could be your own website and not the clients’. It might work, but I can’t tell for sure as I haven’t done it so far. I wouldn’t worry so much about the limits, though. Caching the response allows you to get away with just a few calls per hour (one for the main call and then, one for each photo that you fetch).
If you try it, let me know about the results. It would be nice to know.
Was wondering whether anybody knows how to get the children elements of CAROUSEL posts as well.
Hi,
The function has a parameter
$restrict, which accepts the following options: IMAGE, VIDEO, CAROUSEL_ALBUMSo, using it with CAROUSEL_ALBUM would give you what you want. You could pass multiple values if you want, like so:
get_instagram_media(TOKEN, USER_ID, 10, 'media_url,permalink,media_type,caption', ['IMAGE', 'VIDEO', 'CAROUSEL_ALBUM'])Nope, that’s not what I’m after – I believe the command above will get you the first picture/cover picture of the CAROUSEL_ALBUM but not all the pictures in the album – I believe there is some ‘children’ parameter that would return you an array of the picture urls in that specific album?!
Thanks again
Check the API documentation. I believe that you the “edges” part is what you want (haven’t tested it though to tell you exactly how to use it).
this worked as my fields parameter using some different script: ‘caption,media_url,media_type,permalink,timestamp,username,children{media_type,media_url,thumbnail_url}’,
Nice! Thanks for the update, as someone else might need it too.
Hope you can help me on this – what I cannot figure out is how to get the pagination working – by setting the limit parameter to the url I’m supposed to get the next endpoint according to this: https://stackoverflow.com/questions/59814442/instagram-basic-display-api-pagination
the javascript script I’m currently using actually returns this – however I’m unable to get the information using your php function – any idea how to get this working.
Thanks
I’m affraid I don’t know. Pagination is something that I haven’t used so far. Keep in mind though that my function uses a transient to store the output, so if you make changes to it and expect a different output, you might not get it because it will only get cleared after an hour. I am mentioning it just in case.
as I’m trying to understand your code, I was wondering why you’re using two requests to get the pictures – the first request as I understand is just to get the media ids and then you basically do one request per media or am I missing something.
couldn’t you just get all the info required in one request – that’s what I’m doing with my javascript script?
the limit parameter does not seem to work using the php function whereas it works in javascript, so I’m kind of lost on this one
That’s what I’m explaining in the post: I didn’t find a way to get the photos in one call. I had to do one API call to get the media ID’s first, and then another one for fetching each item’s content. Can you share your JS code in a snippet or GitHub gist to see how you fetch the data in one call?
First of all, incredible article. Well written, well coded. One of the only websites explaining this annoying change by Facebook so well :).
My one worry is how you use Transients. According to the WordPress documentation:
transient expiration times are a maximum time. There is no minimum age. Transients might disappear one second after you set them, or 24 hours, but they will never be around after the expiration time.
So it seems possible for the call to be made many times within an hour, as the hour parameter is only acting as a maximum time to wait. Am I misunderstanding something?
Hi, and thank you for your comment.
Indeed, you can’t rely on transients for time sensitive data, as they can be deleted by a plugin or some other unexpected factor. On that particular case, though, they seem like a nice fit, as we only use them to make sure that no excessive calls will be made. Doing a few more calls withing the timeframe of an hour, which is Instagram’s limit, won’t hurt, as it is highly unlikely that they will be enough to exceed the limit.
On that note, one improvement that I want to make at some point (probably during Christmas, when hopefully I’ll find some free time) is to locally download and store the photos and their IDs. That way, we can have a fallback in case the API call fails to fetch all the photos (on which case we would have to wait an hour until we re-fetch them) and we could also minimize the API calls, avoiding to re-fetch already existing photos, or even further optimize them locally.
Great article and thanks for the code snippet. It works perfectly to get the media from our own user but any ideas on how we can use this to get from another public account? Thanks!!
Hi, I stumbled upon your post while trying to find a way for my website to refresh the Long Lived Token for my Instagram feed but the kicker is that I am not using WordPress.
I’m a very basic coder and only tend to build websites for things I’m involved in, so while I’ve done stuff like this for many years it’s usually few and far between, maybe I need to move onto a service like WordPress but I’m just so used to making websites myself.
All that aside my site is HTML/PHP coded and for the instagram feed I used the Javascript code from this youtube video https://www.youtube.com/watch?v=resyjrQhSFE but after 60 days my token expired.
I’m looking for the most succinct way to call the refresh, it seems like it should be easy as you can just run it from a browser to manually do it but so far I’ve turned up nothing other than Linux commands.
Would really appreciate any input.