
When I created Slash Admin back in 2013, my intention was to use it mostly for my personal convenience, gathering functionality that I used often on most of my sites.
Over the years, more and more functionalities have been added, while others became deprecated. Furthermore, I am not its sole user anymore, as it may not be the most popular plugin out there, but it seems that there are a few people using it.
Being the plugin’s creator, I obviously know all of its features. A new user, though, might be overwhelmed by the many options available, missing a few interesting features.
In this post, I am going to present some of the things that you can do with Slash Admin. More or less, the things that I still use my self too.
#1. Hide backend features from Editors
The main reason Slash Admin was created in the first place was to have an easy way to hide unnecessary options from the content editors. Keeping yourself as the only Admin of the site and having the rest of the users as Editors or Shop Managers is considered a good practice, mostly for security reasons but also because it is more user-friendly.
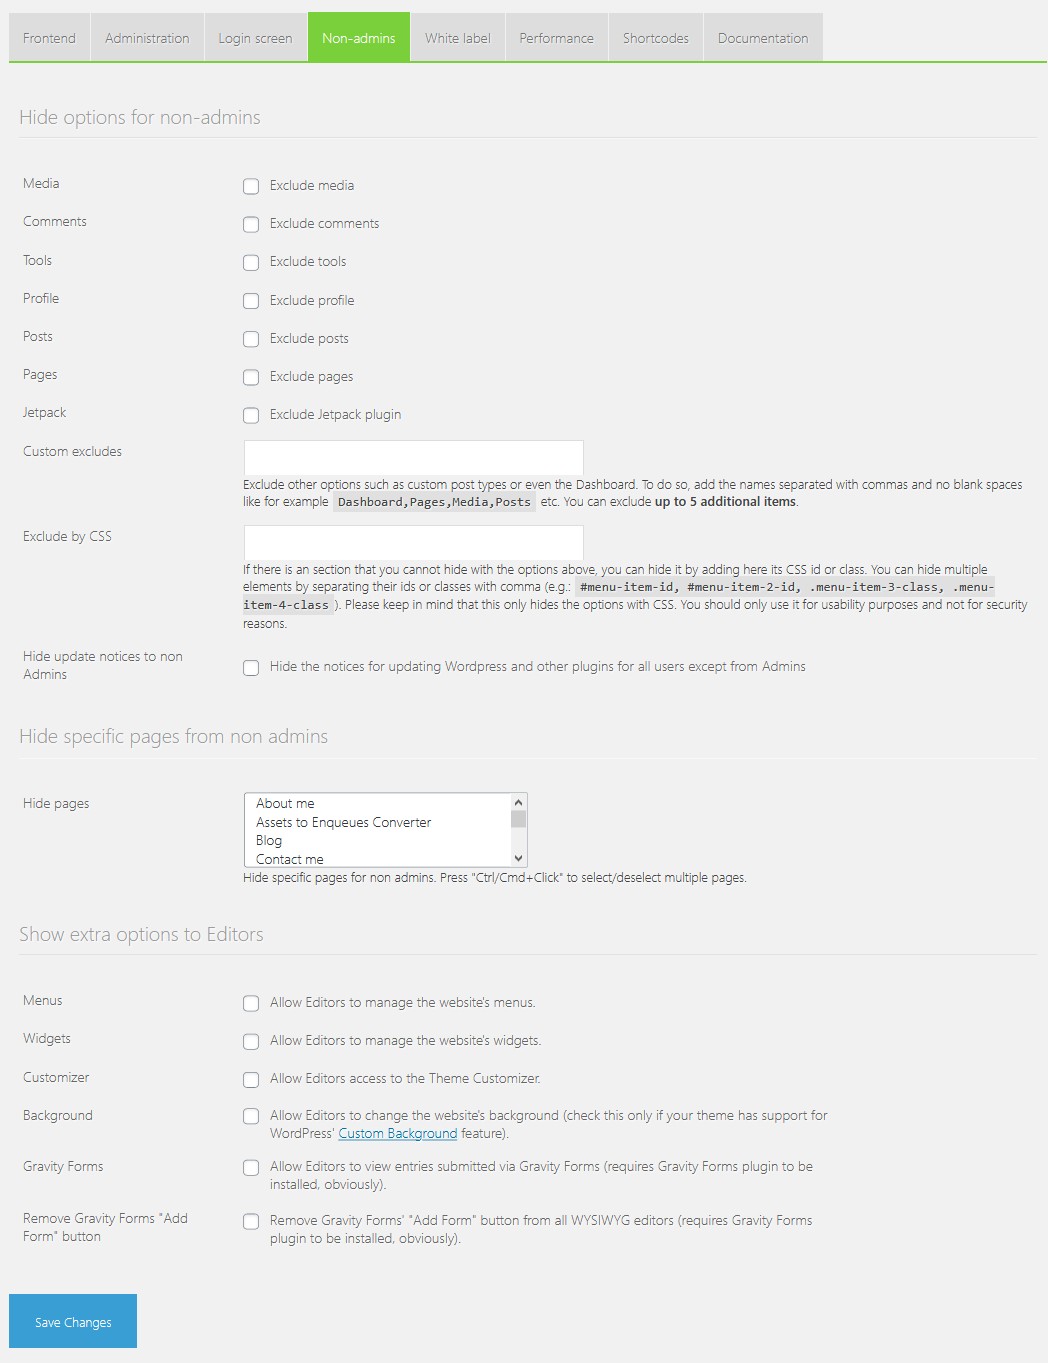
So, going to the Non-admins tabs, you can do the following:
- Hide unnecessary options from non-admins. You can select the wp-admin sections that you want to hide simply by clicking on their respective checkboxes. If the section that you are looking for isn’t among the available options, you can hide it by either add its name in the
Custom excludesfield or, if that fails, pass its classname or id in theExclude by CSSfield. - Hide update notices to non-Admins.
- Hide specific pages that for whatever reason the Editor’s shouldn’t have access to.
- Show some extra options that under normal circumstances should only be available to Admins. Those options include editing of the site’s Menus and Widgets, access to the Site Customizer, as well as some Gravity Forms related mods. Why Gravity Forms only, you might ask. Well, simply because that’s what I use (as I already mentioned, I made the plugin mostly for personal use).
#2. The “Techie” user
“Techie” is the tech-savvy user who will be the only one with access to a few special functionalities of the Admin, even if the site has more than one Admins. These functionalities include the following:
- The Site Health Tool, introduced in WordPress 5.2.
- the ACF control panel, to avoid others messing with your custom fields.
- The receiver of the email notifications being sent automatically by WordPress’ built-in feature that detects when a plugin or theme causes a fatal error on your site.
- The receiver of the Plugin and Theme auto-update email notifications.
Assigning a user with the “Techie” attribute will hide those parts of the wp-admin from everybody else, even if they are also Admins, except for the given user.
You can find it at Administration → Admin overrides
#3. Load Web Fonts locally
Slash Admin already had an option that would allow you to properly enqueue Google Web Fonts on your site. Recently, though, the WordPress Themes Team announced the release of its new Webfonts Loader project, a drop-in script that allows theme authors to load web fonts from the user’s site instead of a third-party CDN.
On my tests I found that it already works fine and I began using it already as it improves performance and privacy. Until it finds its way to the core, and to avoid having to manually update the script on every custom theme I make, I added it as an option on Slash Admin. That way, I will only have to update it once on the plugin, which in turn will be updated automatically on all my sites.
You can find it at Frontend → Fonts
#4. Show a “Loading” animation
An easy way to display a “Loading” animation which disappears when the page is fully loaded. By default, it will use the site’s Favicon, from Appearance → Customize → Site Identity → Site Icon. You can upload a different icon if you like, as well as customizing its colors.

It can be found under Frontend → Loading animation.
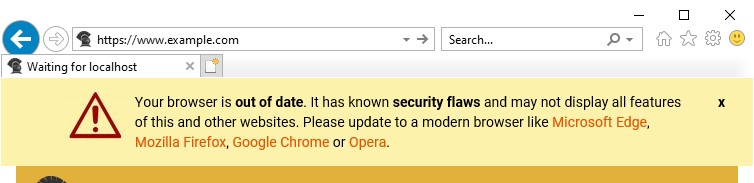
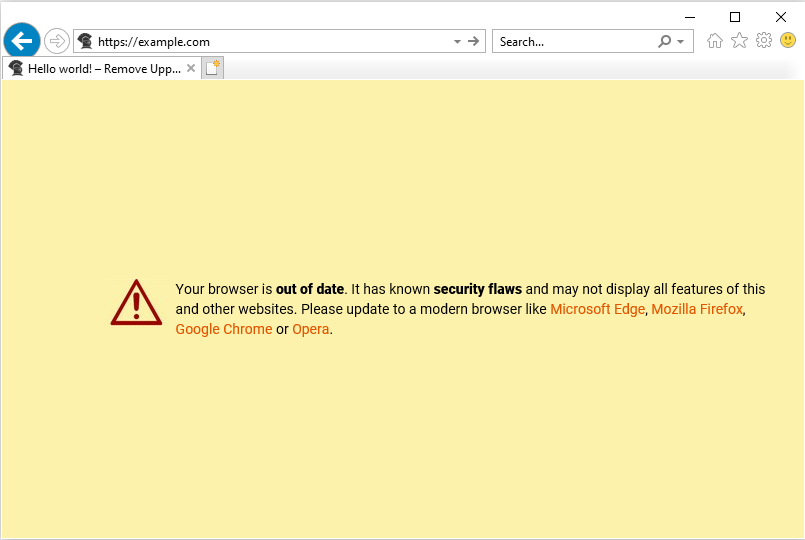
#5. Show a warning to users of Internet Explorer
Internet Explorer can be a huge pain if you want to implement modern techniques in your HTML, CSS, and JavaScript and as time passes by, fewer and fewer people use it. If you don’t want to support Microsoft’s legacy browser, you can and enable the option found at Frontend → Old IE Warning. You can keep it discreet (just a bar at the top that the user can hide) or aggresive (fullscreen mode which cannot be removed), depending on how bad your site breaks on that browser.
If you want to modify the texts, there is a slash_ie() hook, which you can use as follows:
function slash_ie_overrides( $text ) {
	$text['warning']     = 'My warning message';
	$text['icon_title']  = 'My icon title text';
	$text['close_title'] = 'My close button text';

	return $text;
}

add_action( 'slash_ie', 'slash_ie_overrides' );
#6. Remove prefix from archives
WordPress by default prefixes the archives’ titles with their names (e.g. “Category: WordPress Plugins”), which is as annoying as it sounds. Get rid of it by enabling the respective option found under:
Frontend → Miscellaneous → Remove prefix from archives
#7. Protect email addresses from spammers
If you manually include email addresses in your posts, you should consider disguising them in order to “fool” e-mail harvesters.
Slash Admin uses WordPress’ antispambot() function to offer a few shortcodes that you can use on your theme. More specifically:
[slash_mail address="[email protected]"] disguises the email address to make it unreadable from mail harvesters and displays it as plain text.
[slash_mailto address="[email protected]"] does the exact same thing, but it also transforms the text into a “mailto” link as well.
[slash_mail] and [slash_mailto] (same as above but with no parameters given) automatically retrieve the email address of the author of a post/page.
If you find it cumbersome, there is an option to filter the_content() and automatically obfuscate email addresses found on the main content of your posts. That option can be found under:
Frontend → Miscellaneous → Obfuscate emails
#8. Modify taxonomies
Slash Admin offers two main functionalities when it comes to taxonomies:
- The option to make WordPress respect the order by which you enter tags in a post.
- The option to remove support for tags and categories, if your site makes no use of them.
Both options can be found under Administration → Taxonomies.
#9. Customize the login screen
I don’t want to hide the fact that I use WordPress. I just want to make some usability improvements, maybe along with some slight personalization of the login screen.
Going at the Login screen tab you will be able to replace the WordPress logo with your own image, fix the links to send you to your website instead of wordpress.org and, if you like, add some CSS for that particular screen.
Additionally, you can redirect users to the website’s homepage instead of their profile page after they login, and disable the Admin Bar for all users except the Administrators. That last one applies only to the frontend, meaning that if the user directly hits wp-admin, he/she will see no difference.
#10. Show an HTML splash page
There are many plugins to show a custom splash page while your site is under development, and you should probably prefer them most of the time (I do, too).
The difference with Slash Admin’s respective option is that it will redirect anonymous users to a static splash page located on a folder in the root of your WordPress installation. In there, you can put plain old HTML or PHP without restrictions and without having to pollute your theme’s files with temporary code that should be removed when the site goes on air.
Find it at Frontend → Custom Splash page
#11. Add a very basic cookie law consent message
This feature existed in Slash Admin years before the GDPR and I kept it as it might be convenient on some occasions. More specifically, it can be a quick and easy way to point to your site’s terms of use, as long as your site is very simple, with no cookies and tracking scripts other than Google Analytics.
If your site uses many scripts and cookies and if you are serious about data privacy (which you should be), though, you should definitely prefer some other, more feature-rich, and complete plugin for that particular job.
The option can be found under Frontend → Cookie Law consent message
#12. Add scripts at the head, body and footer
If you want to add a script at some part of your site and you don’t want to edit the theme’s files nor to install a new plugin just for that, that option might be useful. It can be found under Administration → Inject scripts. I mostly use it to add Google Analytics tracking code in the <head>, but you can also use it to add content right after the <body> opening and before the closing of the </footer>.
As a bonus, it can work along with the cookie consent message to load scripts only if a specific cookie is set, by wrapping your script’s code with <<cookie=eucookie>><</cookie>>, like for example: <<cookie=eucookie>>YOUR SCRIPT HERE<</cookie>>
#13. A more convenient var_dump
If you write code and you do var_dump from time to time, you know that the output isn’t so easy to read. slash_dump()is nothing more than a var_dump wrapped in a <pre></pre> tag. Technically it’s no big deal, but it can make the code more readable. Additionally, there is also the slash_admin_dump() function, which does the exact same thing, only this time the output is printed only if you are logged in as an Admin (which is useful if you want to var_dump in a live site).
Besides the above, Slash Admin contains a few more functions that might improve the site’s performance, adjust some JetPack settings, and more. The former can be better handled from a dedicated speed optimization plugin (that’s what I do too) and, as for the latter, as I don’t use JetPack anymore, I haven’t tested if they still work. Giving it a try shouldn’t cause any harm, though.
Despite its many options, Slash Admin shouldn’t trigger any action unless it is specifically set from its control panel. Therefore, if you only need it for just a few of its options, it should be fine to do so without bloating your site. If you do encounter any issues, though, you can report them on the support forum.